How to Make a Felt Story Board (Easy DIY for Toddlers and Preschoolers)
A step-by-step guide to making a DIY felt story board plus felt story pieces for toddlers and preschoolers — including templates for classic stories, alphabet, numbers, and seasons.
By The Slow Childhood
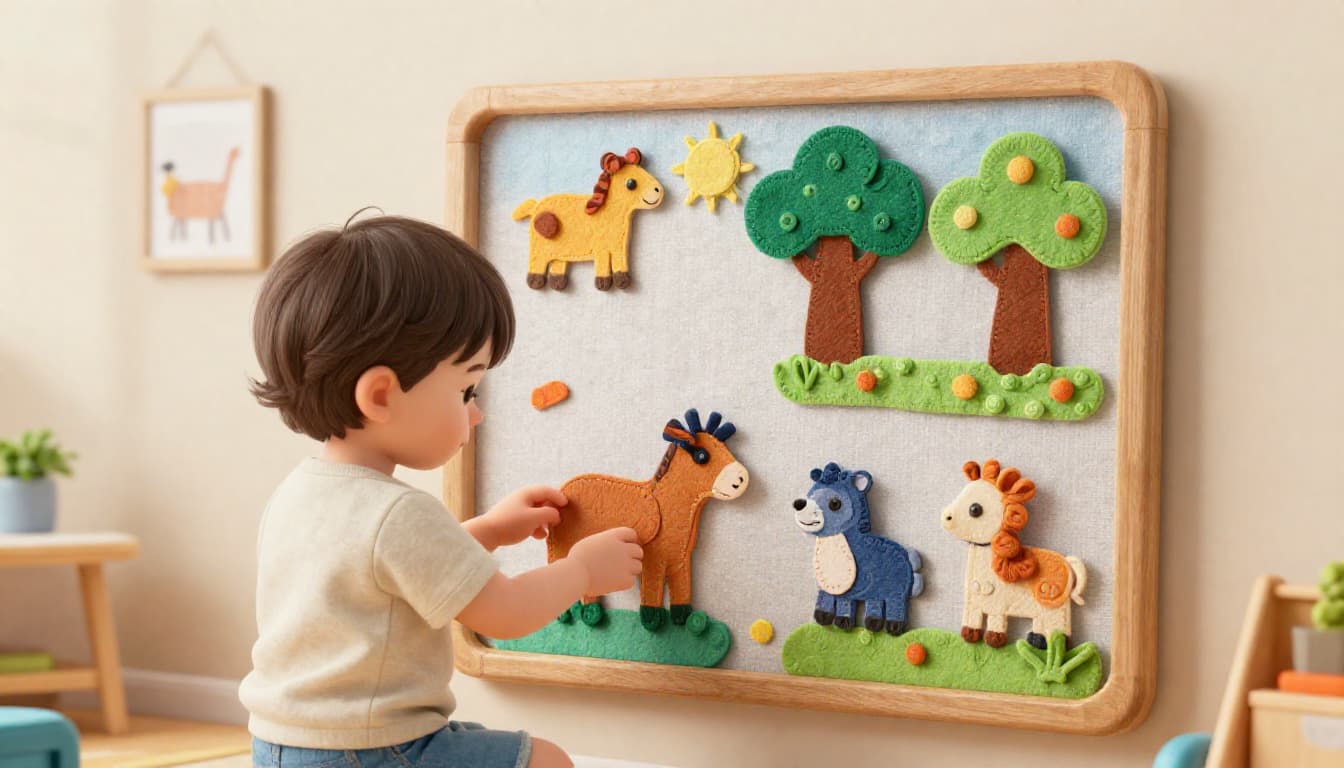
There is a moment in every toddler storytime when the child reaches out to touch the page. They want to hold the bear, move the moon, put the caterpillar on the leaf themselves. A felt story board turns that impulse into a learning tool. Instead of just listening to a story, your child becomes part of it — placing characters on the board, moving them through scenes, and eventually retelling the whole thing on their own.
Felt boards (also called flannel boards) have been used in classrooms and libraries for decades, and there is a good reason they endure. They are inexpensive, infinitely customizable, screen-free, and they quietly build a remarkable range of skills — vocabulary, narrative understanding, sequencing, fine motor control, imaginative play, and early literacy. A single board with a few story sets can provide years of use.
This guide walks you through making your own felt board and felt story pieces from scratch, with templates and ideas for stories, alphabet sets, number sets, and seasonal themes. The whole project costs very little and can be completed in an afternoon.
Why Felt Story Boards Are Worth Making
Language Development
When a toddler places a felt fox on the board and you say "the fox is running through the forest," you are building vocabulary, modeling sentence structure, and connecting a physical action to language. This multisensory approach to language — hearing, seeing, and touching simultaneously — is far more effective than hearing alone. Children who regularly use felt boards develop larger vocabularies and stronger narrative skills than those who only listen to stories.
Story Comprehension and Retelling
Retelling is one of the most important early literacy skills, and felt boards make it tangible. A child who has heard "The Very Hungry Caterpillar" ten times can use felt pieces to retell it — placing the egg on the leaf, moving the caterpillar to each food, adding the cocoon, and revealing the butterfly. This active retelling deepens comprehension in a way that passive listening cannot match.
Independent Play
Once children learn the stories, a felt board becomes an independent activity. A three-year-old can spend twenty or thirty minutes at a felt board, retelling stories, mixing characters from different sets, and inventing entirely new narratives. For homeschooling families, this kind of focused independent play is gold — it gives you time while your child is genuinely engaged in meaningful learning.
Montessori Alignment
Felt boards align beautifully with Montessori principles. The child works independently, choosing materials from a prepared environment. The activity involves concrete, hands-on manipulation rather than abstract concepts. And the work is self-correcting in a natural way — when the story feels "wrong," the child rearranges the pieces until it feels right.
How to Make the Felt Board
You have several options for the board itself, ranging from essentially free to about $20. We will cover three approaches.
Option 1: Fabric-Wrapped Board (Our Favorite)
This produces the sturdiest, most attractive board and is what we recommend for daily use.
Materials:
- A large piece of stiff board — foam core, cardboard, cork board, or a canvas board (we recommend a foam core board in 20x30 inches for a good working size)
- A large piece of felt, flannel, or low-pile fleece in a neutral color — about 4 inches larger than the board on all sides
- A hot glue gun or strong double-sided tape
- Scissors
Steps:
- Lay the fabric right-side down on a flat surface.
- Center the board on the fabric.
- Pull the fabric over one long edge and glue or tape it to the back of the board. Pull it taut but not tight enough to warp the board.
- Repeat on the opposite long edge, pulling gently to keep the front surface smooth.
- Fold the short edges like wrapping a gift — fold corners in neatly, then pull the edge over and secure.
- That is it. Flip it over and you have a smooth felt surface ready for story pieces.
Tips: Choose a neutral color for the board — light blue, cream, gray, or light green all work well as a "background" for story pieces. Avoid dark colors, which make it harder to see darker felt pieces. If you want to get fancy, use light blue for the top two-thirds (sky) and green for the bottom third (ground) by gluing two pieces of felt side by side.
Option 2: Easel-Mounted Board
If you already have a tabletop or floor easel, you can simply drape or clip a large piece of felt over it. This gives you a slanted surface at child height, which is ideal for toddlers who want to stand and play.
Materials:
- A piece of stiff felt or flannel fabric large enough to cover the easel surface
- Clips or clothespins to secure it
This is the fastest setup and works well if you want to use the easel for other purposes too — just clip the felt on for story time and remove it for painting.
Option 3: Wall-Mounted Board
For a permanent installation, mount a fabric-wrapped board directly to the wall at your child's standing height. Use Command strips for a damage-free installation that holds well. This frees up floor space and creates a dedicated storytelling station.
A wall-mounted board at child height is particularly effective because it keeps the felt board always available and always visible — an open invitation to play.
Making Felt Story Pieces
This is the heart of the project and where the real fun begins. You do not need to be artistic to make great felt pieces — simple shapes work beautifully, and perfection is not the goal.
Materials for Felt Pieces
- Stiff craft felt sheets in assorted colors — a variety pack of 40-50 sheets gives you every color you will need for months of projects
- Sharp fabric scissors — this makes a real difference; dull scissors produce ragged edges that frustrate both you and your child
- A fabric marker or chalk pencil for tracing
- Hot glue gun for assembling multi-piece characters (optional — simple pieces do not need this)
- Embroidery floss and a needle for adding details (optional)
- Cardstock or printed templates for tracing
Basic Technique
- Find or draw a simple outline of the shape or character you need. Search online for "felt board printable template" plus the story name, or simply draw your own — remember, simple is better.
- Print or draw the template on cardstock and cut it out.
- Trace the template onto felt using a fabric marker or chalk pencil.
- Cut the felt on the traced line with sharp scissors.
- For characters with multiple colors (like a brown bear with a black nose and white eyes), cut each color piece separately and glue them together with small dots of hot glue.
Tips for Better Pieces
- Use stiff felt rather than thin, floppy felt. Stiff pieces are easier for small hands to pick up, hold their shape better on the board, and last much longer.
- Keep shapes simple. A circle with two triangles on top and two dots for eyes is a perfectly recognizable cat to a toddler. Realistic detail is unnecessary and makes cutting harder.
- Make pieces large enough for small hands. Each piece should be at least 3-4 inches in its longest dimension for toddlers. Pieces smaller than 2 inches are frustrating for little fingers to manage.
- Double up thin felt by gluing two layers together for extra stiffness if you only have thin felt available.
Story Sets to Make
Classic Stories
These stories work beautifully as felt board sets because they have a small cast of characters, repetitive structure, and clear sequence.
"Brown Bear, Brown Bear, What Do You See?"
Pieces needed: Brown bear, red bird, yellow duck, blue horse, green frog, purple cat, white dog, black sheep, goldfish, teacher/mother, children (group piece)
This is arguably the perfect first felt board story. The repetitive structure means children memorize it quickly, and each page is essentially one character. A two-year-old can "read" this story independently using the felt pieces within a few retellings.
Cutting guide: Each animal is a single color, so you need just one piece of felt per character. Keep the shapes simple — a bear is a round body with round ears. A bird is an oval with a triangle beak and a triangle tail. A duck is a round body with an oval head and a flat beak.
"The Very Hungry Caterpillar"
Pieces needed: One small egg (white circle), one caterpillar (green with red head), one cocoon (brown oval), one butterfly (multicolor), a green leaf, one apple, two pears, three plums, four strawberries, five oranges, plus the Saturday food items if you want the full set (chocolate cake, ice cream cone, pickle, slice of cheese, slice of salami, lollipop, piece of pie, sausage, cupcake, watermelon slice)
This story is a wonderful vehicle for counting, days of the week, sequencing, and healthy eating conversations. The Saturday binge is always the highlight for children.
Cutting guide: Fruit pieces can be very simple — a red circle for apple, a green pear shape, a small purple oval for plum. The caterpillar can be a series of green circles glued in a row with a red circle for the head and two small black dots for eyes.
"Goldilocks and the Three Bears"
Pieces needed: Goldilocks (yellow-haired girl), Papa Bear (large brown bear), Mama Bear (medium brown bear), Baby Bear (small brown bear), three bowls (large, medium, small), three chairs (large, medium, small), three beds (large, medium, small), a house, a table
This story teaches size concepts (big, medium, small) naturally through the telling. Children love the repetition of "too big, too small, just right" and will echo it enthusiastically while placing pieces.
"The Three Little Pigs"
Pieces needed: Three pigs (pink circles with ears and snouts), one wolf (gray), a straw house (yellow), a stick house (brown), a brick house (red), and optionally a pot and fire for the chimney scene
The sequential destruction and the dramatic huffing and puffing make this an endlessly engaging felt board story. Children often request it daily once the pieces are made.
Alphabet Set
An alphabet felt set turns the board into a literacy tool that you will use for years.
Pieces needed: 26 uppercase letters, and optionally 26 lowercase letters
Cutting guide: Print block letters (a chunky sans-serif font like Arial Black works well) at about 3-4 inches tall. Trace and cut from felt. Use different colors to make the set visually engaging — vowels in one color and consonants in another is a Montessori-aligned approach (traditionally blue for consonants and red for vowels, or pink for consonants and blue for vowels depending on the Montessori tradition).
How to use:
- Letter recognition — place a letter and name it, ask your child to find a specific letter
- Alphabetical order — arrange all 26 letters in order on the board
- Spelling — spell simple CVC words (cat, dog, sun) on the board
- Initial sounds — place a letter and gather objects from around the house that start with that sound
- Matching — match uppercase to lowercase
Number Set (1-20)
Pieces needed: Numbers 1 through 20, plus a set of small counting objects (circles, stars, hearts, or animals — 20 of the same shape)
How to use:
- Number recognition — identify numbers placed on the board
- Counting — place a number and count out the matching quantity of objects
- Sequencing — arrange numbers in order
- Simple addition — "Put 3 stars on one side and 2 stars on the other. How many stars altogether?"
- Number bonds — explore different ways to make 5 or 10
Seasonal and Weather Sets
These pieces get year-round use and connect to science, calendar time, and daily observation.
Spring pieces: Flowers (tulips, daisies), rain cloud, sun, rainbow, caterpillar, butterfly, bird, nest with eggs, green leaves, umbrella, rain boots, puddles
Summer pieces: Bright sun, sunflower, beach ball, swimsuit, sandcastle, seashell, watermelon slice, ice cream cone, ladybug, dragonfly, green tree
Fall pieces: Colored leaves (red, orange, yellow, brown), pumpkin, apple, acorn, squirrel, scarecrow, bare tree, rake, pie, harvest basket
Winter pieces: Snowflakes, snowman, mittens, hat, scarf, bare tree with snow, icicles, cardinal, sled, mug of cocoa, fireplace
How to use:
- Morning circle — start each day by placing the current season, weather, and date on the board
- Seasonal sorting — mix pieces from all seasons and sort them into the correct group
- Storytelling prompts — choose three random seasonal pieces and make up a story that includes all three
- Nature observation — after a nature walk, place pieces that match what you observed outside
Using the Felt Board in Daily Life
The felt board reaches its full potential when it becomes a regular part of your routine rather than a special occasion activity.
During Read-Alouds
After reading a story aloud from the book, retell it together using the felt pieces. At first, you do most of the placing and narrating while your child watches and helps. Over time, shift responsibility to the child until they can retell the entire story independently. This progression from supported retelling to independent retelling is a powerful literacy scaffold.
During Independent Play Time
Set the felt board in an accessible spot with a basket of pieces nearby. Children will gravitate toward it during free play, mixing characters from different stories, creating their own scenes, and narrating quietly to themselves. This self-directed narrative play builds language skills, creativity, and concentration.
If you are looking for more screen-free independent play ideas for this age, our DIY busy boards for toddlers guide covers another hands-on project that promotes focused solo play.
As a Teaching Tool
The felt board is remarkably versatile for homeschool lessons:
- Math — use counting pieces for addition, subtraction, grouping, patterns, and number bonds
- Literacy — use alphabet pieces for letter recognition, phonics, spelling, and sight words
- Science — use seasonal pieces to discuss weather, life cycles, and habitats
- Social studies — create felt pieces for community helpers, maps, or historical figures
- Calendar time — days of the week, months, weather, and season displayed daily
For Imaginative Play
Beyond retelling known stories, felt boards are a springboard for original storytelling. A child who places a bear, a rainbow, and a mountain on the board and narrates their own adventure is doing sophisticated creative work — inventing characters, establishing setting, creating conflict, and resolving it. This is exactly the kind of imaginative play that builds the narrative skills children need for writing later on.
Caring for Your Felt Board and Pieces
Felt is durable but benefits from basic care:
- Store pieces flat in bags or folders rather than crumpled in a bin — this prevents permanent wrinkles.
- Keep the board surface clean by brushing it gently with a lint roller if it gets dusty or covered in pet hair.
- Spot clean felt pieces with a damp cloth if they get dirty. Avoid submerging them in water, which can cause thin felt to lose its shape.
- Repair torn or worn pieces by cutting a fresh version from felt — keep your cardstock templates so you can reproduce any piece in minutes.
- Rotate sets to keep interest fresh. Store seasonal sets and story sets you are not currently using in labeled bags, and bring them out when the time is right.
What This Project Really Costs
Let us be transparent about the budget:
- Foam core board: $3-5 at a craft store or dollar store
- Felt for the board surface: $2-4 for a large piece
- Assorted felt sheets for pieces: $10-15 for a variety pack of 40-50 sheets (enough for many story sets)
- Fabric scissors (if you do not already own them): $8-15 for a good pair
- Hot glue sticks: $3-5
Total for the board plus several story sets: approximately $25-40.
Compare that to the cost of a single electronic toy, and the value becomes clear. This is a project that costs very little, provides years of use, and builds skills that matter.
Getting Started This Weekend
Here is your simplest path to a working felt board by Sunday:
- Saturday morning: Buy or gather materials — a foam core board, a yard of felt fabric, and a pack of assorted felt sheets.
- Saturday afternoon: Wrap the board. Cut pieces for one simple story (we recommend "Brown Bear, Brown Bear" for your first set — all single-color animals, very easy to cut).
- Sunday: Introduce the board to your child. Read the story from the book first, then retell it together with the felt pieces.
That is it. You will have a working felt board and your first story set in a few hours, and you can add new sets gradually over the coming weeks and months. Our children's favorite sets were often the ones we made together on a quiet afternoon — the cutting is simple enough that preschoolers can help choose colors and older children can cut their own pieces.
Related Reading
If you enjoyed this project, you will find more hands-on DIY ideas in our guide to DIY busy boards for toddlers, which covers another screen-free project that develops fine motor skills and independent play. For more ways to foster storytelling and dramatic play, imaginative play ideas for preschoolers is packed with low-cost invitations to play that build language and creativity. And if you are building a read-aloud library to complement your felt board stories, our guide to the best read-aloud books for homeschool by grade will help you choose titles that work beautifully for retelling.
Frequently Asked Questions
- What age is a felt story board appropriate for?
- Felt story boards are wonderful for children ages 1 through 6 and beyond. Toddlers (12-24 months) enjoy the sensory experience of sticking and removing pieces, and they begin learning vocabulary as you name each piece. Preschoolers (ages 3-5) use felt boards for storytelling, counting, letter recognition, and imaginative play. School-age children (6+) can use them for retelling stories, creating their own narratives, and practicing math concepts. The board stays the same — the pieces evolve with your child.
- What kind of felt works best for a felt board?
- For the board surface, use a large piece of craft felt, flannel fabric, or low-pile fleece — all grip felt pieces well. For the story pieces, stiff craft felt (available in sheets at craft stores) holds its shape better than thin felt and is easier for small hands to manage. Acrylic craft felt is inexpensive and widely available. Wool-blend felt is more durable and has a nicer texture but costs more. For pieces that will get heavy use, stiff craft felt or wool blend is worth the upgrade.
- Do felt pieces really stick to a felt board without glue or Velcro?
- Yes. Felt sticks to felt through friction between the fibers — no adhesive needed. The tiny fibers on felt pieces grip the tiny fibers on the felt board surface, holding pieces in place when the board is upright. This gentle adhesion is strong enough to keep pieces on a vertical board but easy enough for toddler hands to remove and reposition. The effect works best when both surfaces are clean and dry.
- How do I store felt story pieces so they stay organized?
- The best storage solutions keep pieces visible and sorted by set. Ziplock bags labeled by story or theme are the simplest option. Pencil pouches or small cloth bags work well for keeping sets together inside a larger bin. A hanging shoe organizer with clear pockets is excellent if you have many sets — one pocket per story or theme. Some families store pieces in file folders, one per story, which stack neatly on a shelf.
- Can I buy pre-made felt story sets instead of making them?
- Yes, there are many pre-made felt story sets available for purchase, and they can be lovely. However, making your own is significantly cheaper, allows you to customize pieces to match the exact books your family reads, and gives your child the experience of helping create the materials they will use. Many families do a mix — they buy a few pre-made sets for complex stories and make their own simple sets for basic concepts like shapes, colors, and seasons.
Enjoying this article?
Get more ideas like this delivered to your inbox every week.