Homeschool Room Setup: The Complete Space, Furniture & Storage Guide
A complete guide to setting up a homeschool space that actually works — desks, shelving, storage systems, lighting, Montessori shelves, and real small-space solutions, with specific product picks and links to related learning guides.
By The Slow Childhood
People picture a homeschool room as a converted bedroom with a giant world map, color-coded bins, and a Pinterest-perfect reading nook. Some families have that. Most of us do not, and we have learned that the magazine version is not what makes a space work anyway. After years of teaching at the kitchen table, then a dedicated room, then back to a shared corner of the living room when the room became a nursery, we have figured out what actually matters: a clear surface, materials that have a home, and enough light to read by. Everything else is refinement.
This guide is the complete version — desks and tables, shelving and storage, lighting, Montessori-style low shelves, and honest small-space solutions for the families homeschooling from an apartment or a corner of the dining room. We will give you specific products we trust and tell you where to spend and where to save. If you are still in the planning stages of your year, pair this with our homeschool planning and organization guide; the space and the schedule are two halves of the same machine.
Start With the Three Zones, Not the Furniture
Before you buy a single thing, sketch your space into three zones. This is the step that separates a room that works from a room that just looks nice in photos.
- The work zone — where actual lessons happen. A table, a desk, the kitchen counter. This needs a clear, flat surface and good light.
- The materials zone — where the things kids reach for independently live. Books, current curriculum, art supplies, manipulatives. This wants low, open, accessible storage.
- The deep-storage zone — where the overflow goes. Next term's curriculum, the science kit you use twice a year, seasonal materials, the giant pad of paper. This should be closed, labeled, and out of sight.
The single biggest mistake we see is treating all storage as one pile. When the markers your six-year-old uses every day live on the same shelf as the high school chemistry set you bought on sale, both get buried. Separate the daily-access materials from the deep storage and ninety percent of your clutter problem solves itself.
Walk your space and physically point at where each zone will go. They can overlap — our work zone is the kitchen table, our materials zone is a shelf three feet away, our deep storage is a closet down the hall. But you have to know which is which.
Desks and Tables: What to Buy and What to Skip
Here is an opinion that surprises new homeschoolers: most young children do not need a desk. A desk is a single-person workstation, and for kids under about ten, learning is collaborative, sprawling, and frequently happening on the floor. A shared table beats individual desks for most elementary families because you can sit beside your child to teach, spread out a project, and reclaim the surface for dinner.
The Shared Table (Our Default Recommendation)
A child-height table with a couple of chairs is the workhorse of the early years. Look for a wipeable surface and a height that lets your child's feet reach the floor and their elbows rest comfortably. The Sprout Kids adjustable table and the ECR4Kids adjustable activity table both grow with the child, which matters more than it sounds — a table your five-year-old loves becomes a back-hunching nightmare at nine if it cannot be raised. Pair it with a Stokke Tripp Trapp chair or any adjustable footrest chair so feet stay supported; dangling feet make a child fidget within ten minutes.
If you would rather not buy dedicated furniture at all, your existing dining table is completely fine. Add a seat cushion booster and a footrest so the ergonomics work, and you have saved a hundred dollars.
When a Desk Earns Its Place
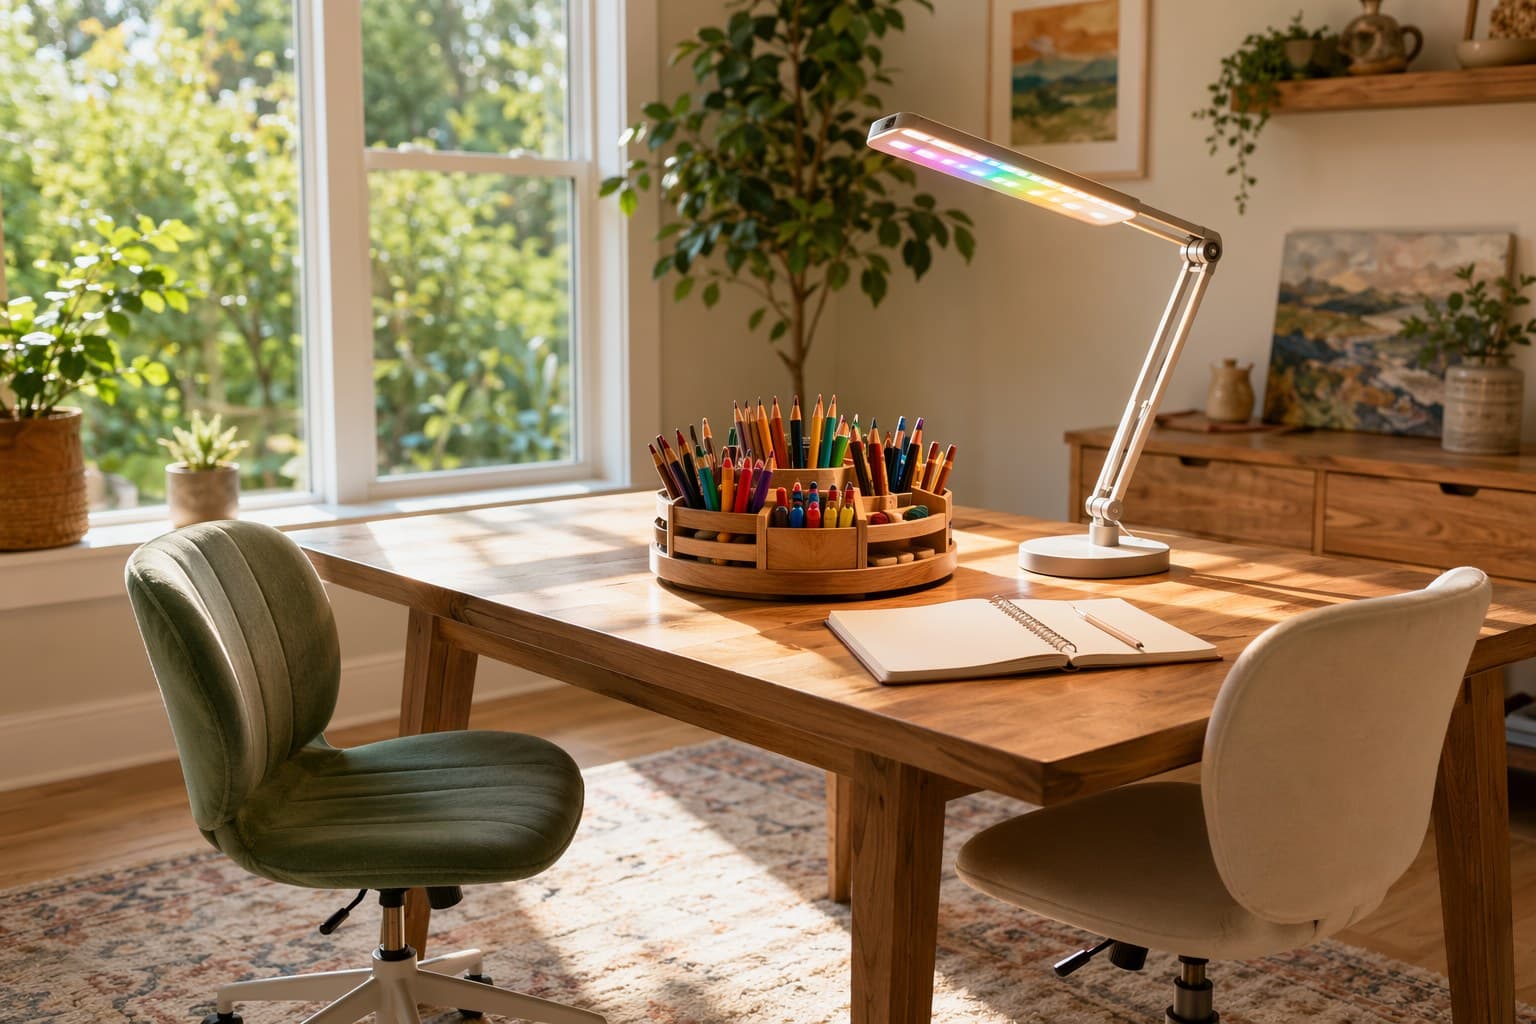
A real desk makes sense for older kids — roughly ten and up — who do longer stretches of independent work and benefit from a space that is theirs. A teen writing essays or working through algebra wants a stable, personal surface with room for a laptop and a book open at the same time. For that, a simple student desk with drawers does the job, and a height-adjustable sit-stand desk is genuinely worth it for the kid who cannot sit still — letting them stand to work is not a gimmick, it is a release valve.
Skip the molded all-in-one school desks with the attached chair and tiny cubby. They look like a classroom but they are uncomfortable, they do not adjust, and your child outgrows them in two years.
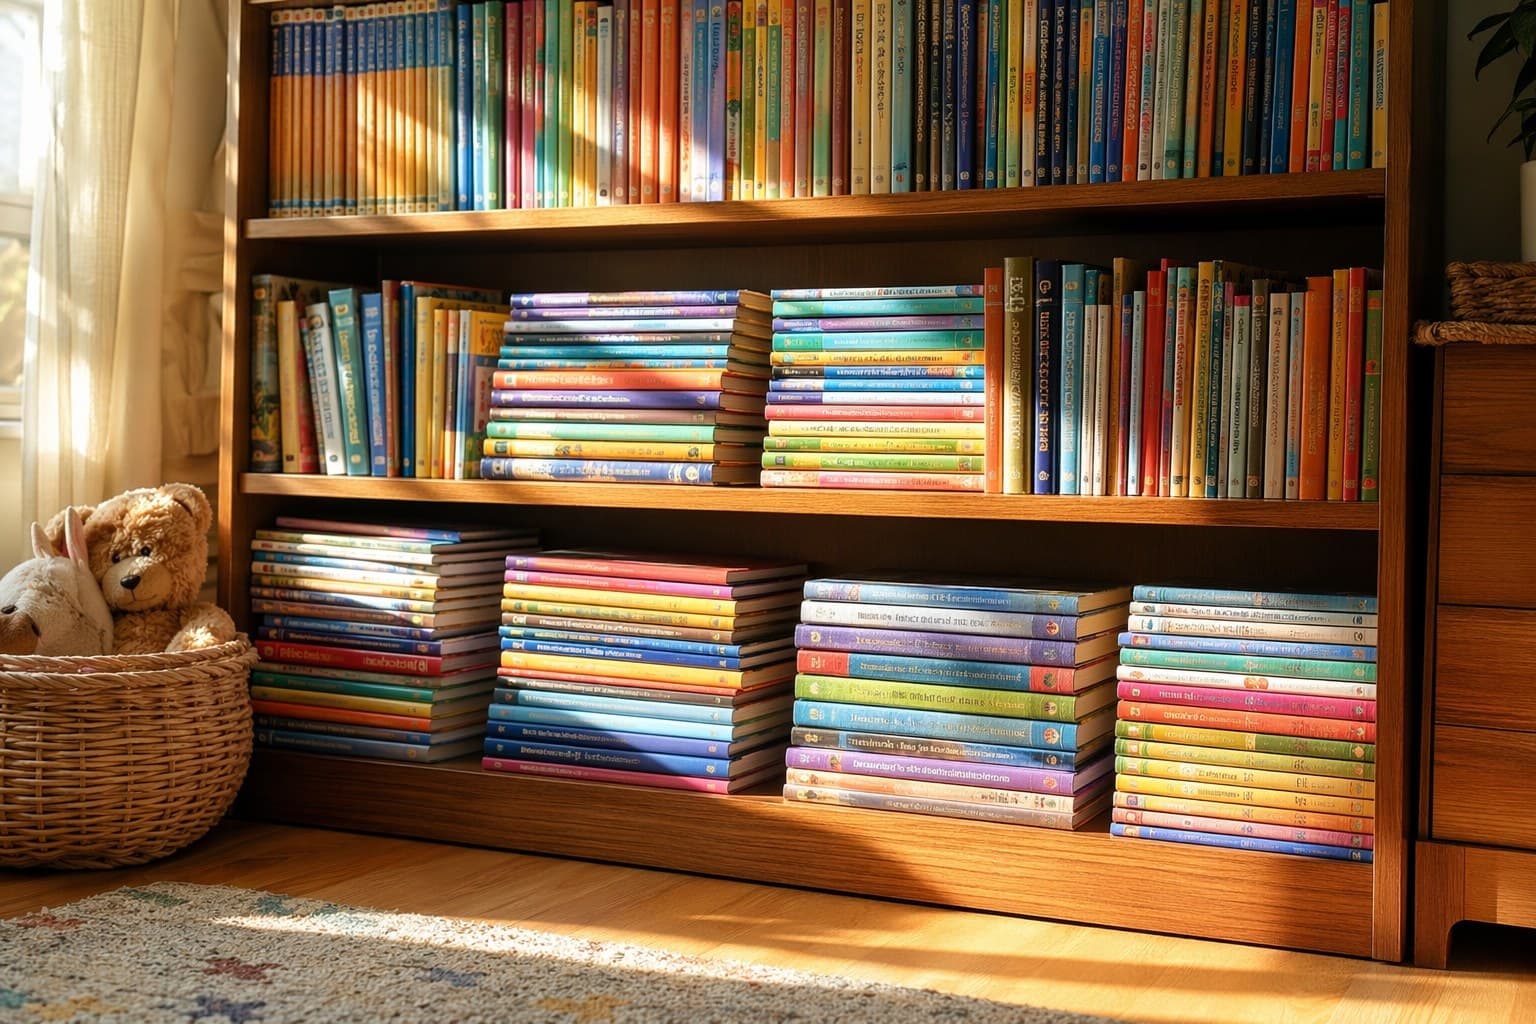
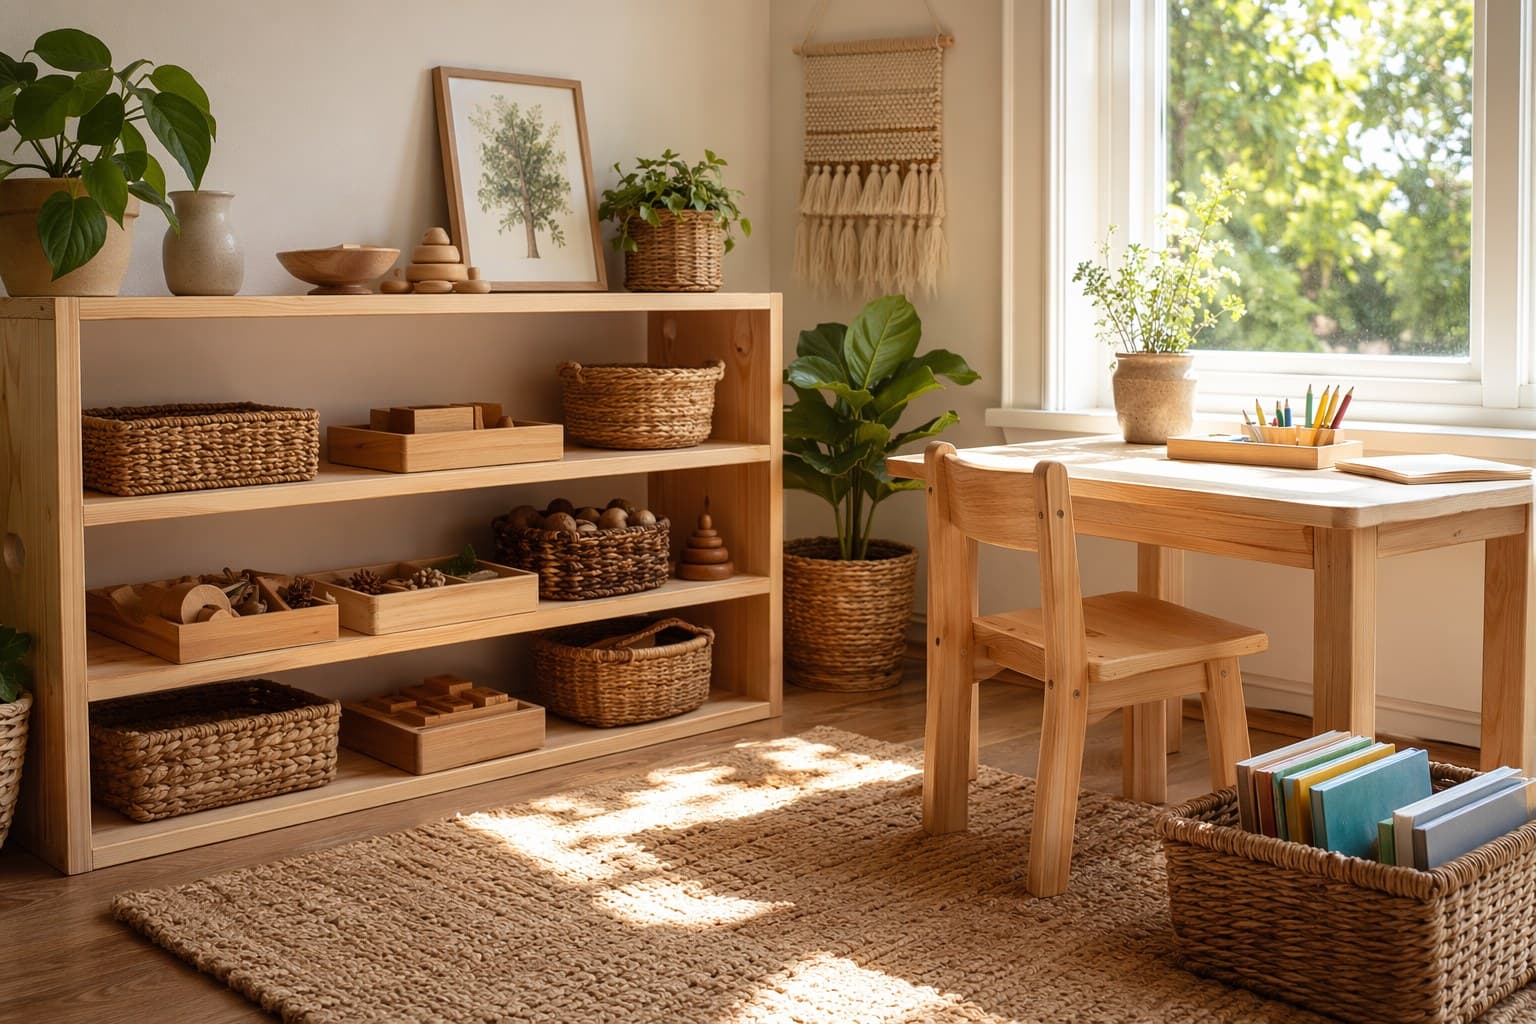
Shelving: The Heart of the System
If you buy one good piece of furniture, make it a bookshelf. Shelving is where your materials zone lives, and it determines whether your kids can get and put away their own work or whether you become a full-time supply clerk.
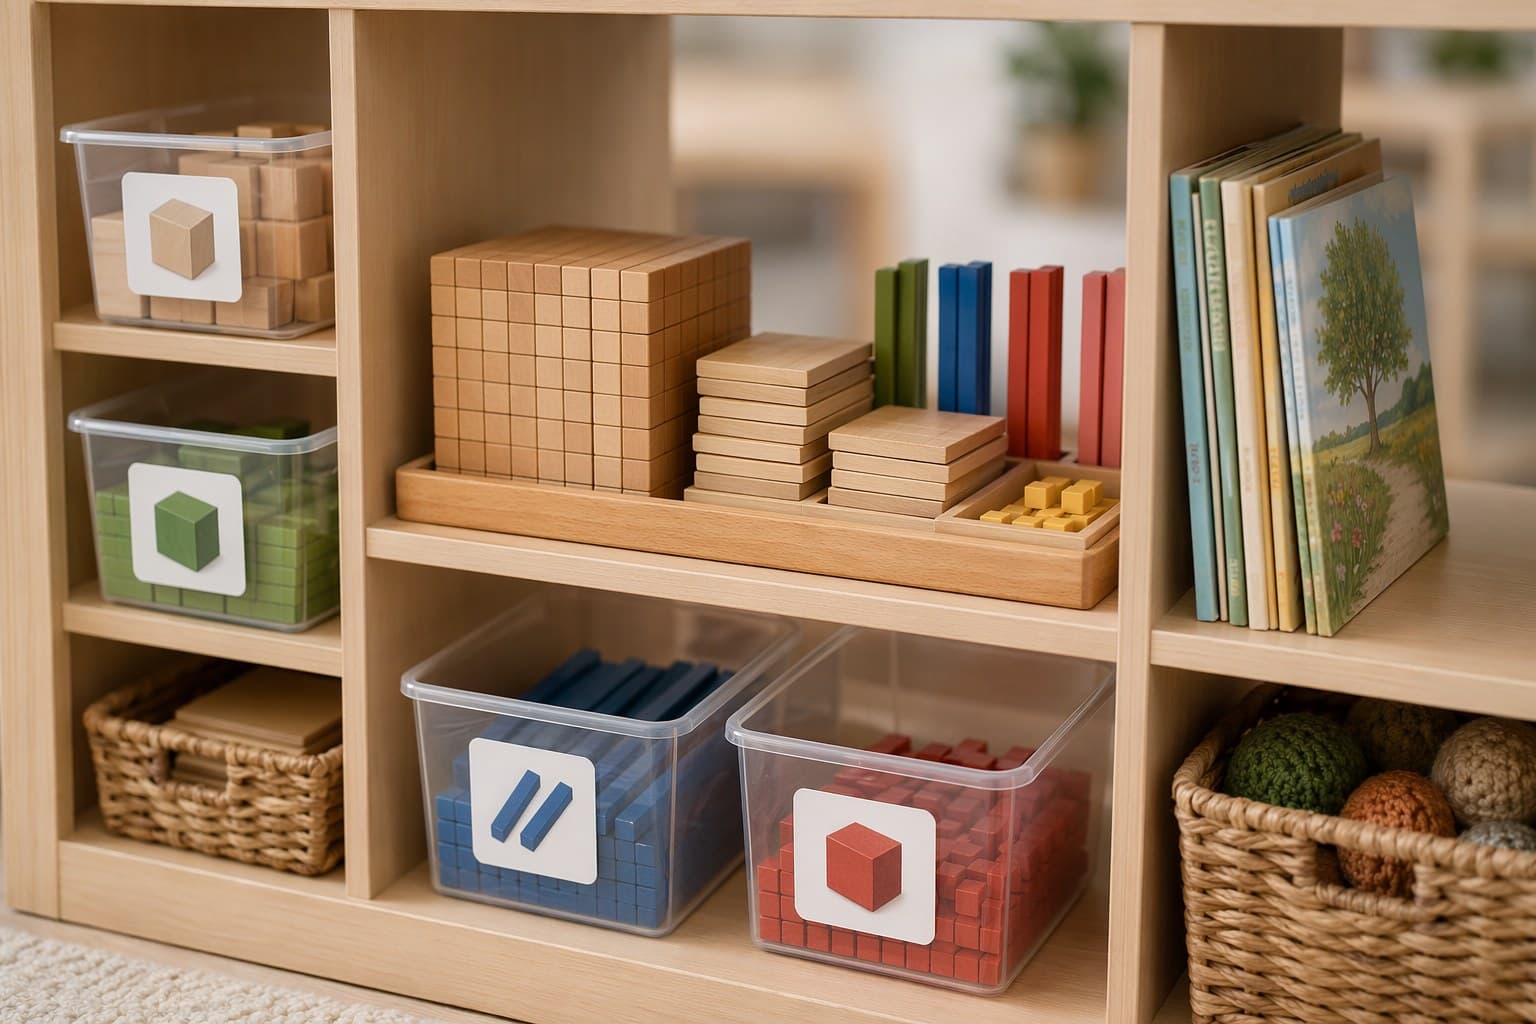
Open, Low Shelving for Independent Access
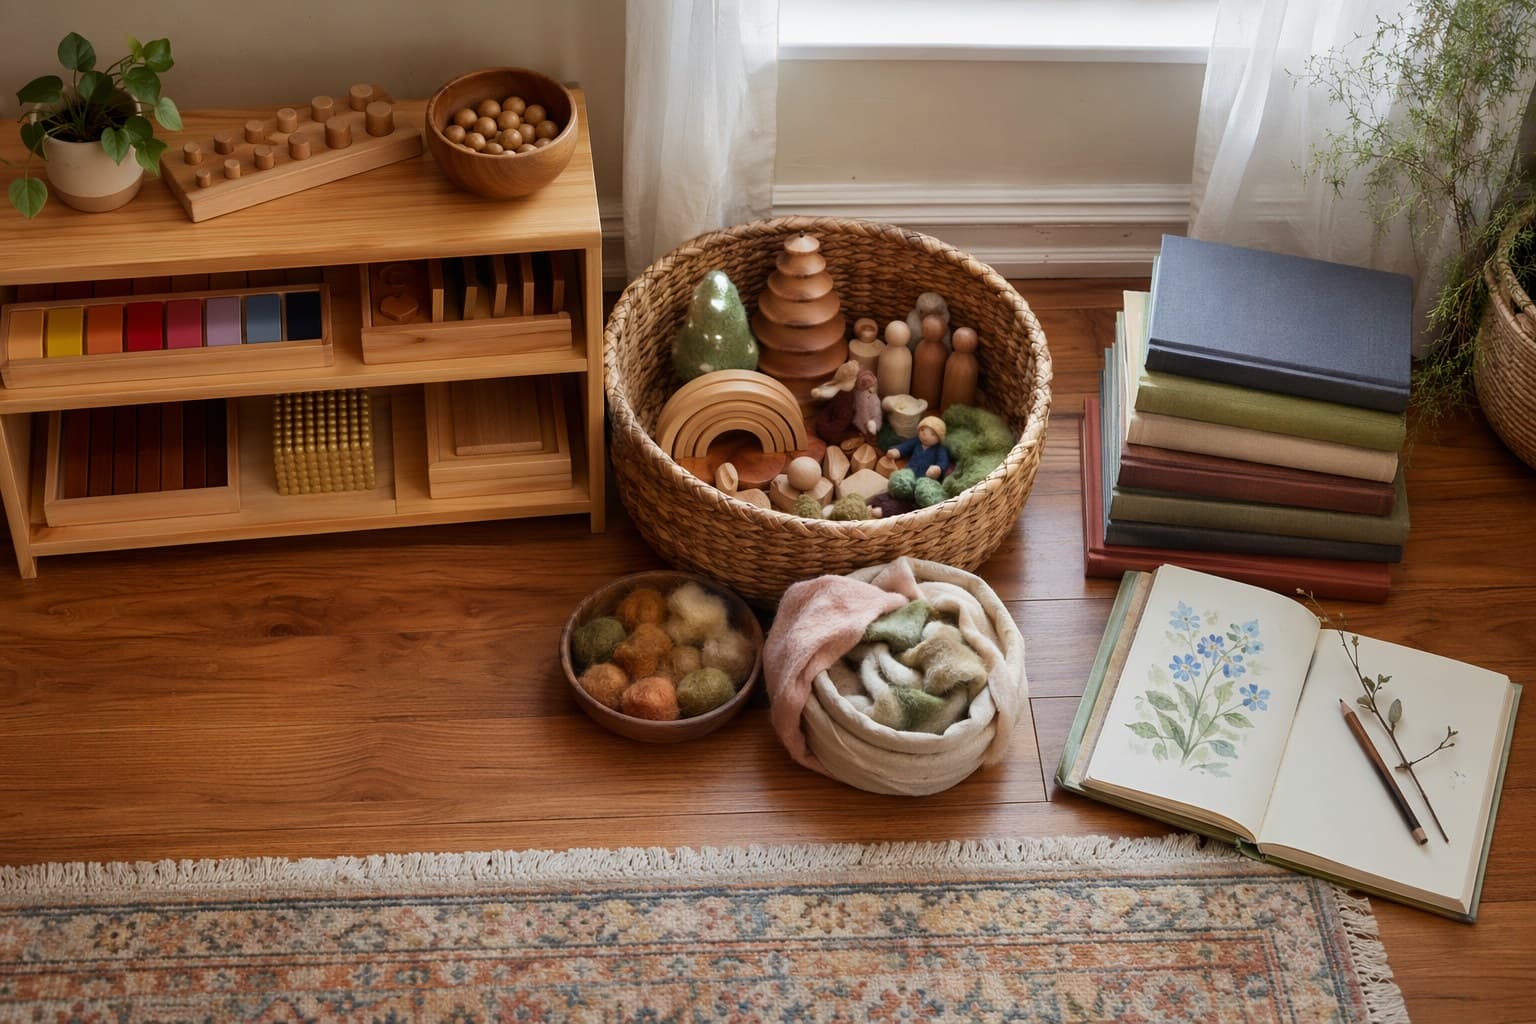
The principle borrowed from Montessori classrooms is simple and powerful: if a child can reach it, a child can manage it. Low, open shelves at the child's height let kids pull out their own materials and — the harder part — put them back. A toddler cannot return a bin to a shelf above their head, but they can slide a tray onto one at knee level.
The most popular shelf in the homeschool world is the humble IKEA Kallax for a reason: the cube grid is the perfect size for books, baskets, and bins, it can stand vertically against a wall or lie horizontally as a low room divider, and it is cheap and bombproof. A 2x4 Kallax laid on its side becomes an instant low shelf with eight open cubbies. For a warmer, more Montessori-aligned look, a dedicated Montessori toy shelf in natural wood has lower, more open shelves designed specifically for tray-based work. We go deeper on arranging one in our Montessori bookshelf setup guide, which is worth reading if you are leaning toward a prepared-environment style.
How to Actually Arrange a Shelf
A shelf crammed full is a shelf nothing comes off of. The Montessori rule is to display fewer things, beautifully spaced, and rotate. Each material or activity gets its own tray or basket so it is a self-contained unit a child can carry to the table and return whole. Leave breathing room between items. Put the most-used materials at the most accessible height and rotate seasonal or finished work into deep storage. A shelf that is seventy percent full invites engagement; a shelf that is overflowing invites avalanche.
For the family building a hands-on materials collection, our DIY Montessori materials at home post shows how to fill those trays without spending a fortune.
Storage and Organization: Taming the Paper and the Stuff
Homeschooling generates an astonishing volume of physical stuff. Worksheets, art, manipulatives, glue sticks that have lost their caps. Good storage is not about having more containers; it is about every category having one obvious home.
Bins, Baskets, and the Labeling Rule
Clear or open bins beat opaque ones for kids because they can see what is inside. A set of stackable storage bins handles manipulatives, blocks, and bulky supplies, while shallow wicker or felt baskets sized to your shelf cubbies hold books and current work. Label everything — and for pre-readers, label with a picture, not just a word. A small picture-and-word label on each bin turns cleanup into a matching game and means a three-year-old can put the animals away in the right place.
Give each child a personal bin or a magazine file for their current books and in-progress work. This is the single most useful container in our house: when the lesson ends, everything that child owns goes back in their file, the table clears, and tomorrow it comes back out intact. No more morning scramble for the lost math book.
The Art and Supply Station
Pencils, crayons, scissors, glue, and tape should live in a grab-and-go caddy so kids never have to ask where things are. A simple rotating art supply caddy in the center of the table puts everything within reach and travels from table to floor to porch. For the deluge of finished artwork, mount a wire and clips or a hanging art display on one wall, rotate the favorites, and photograph the rest before recycling. Trying to keep every piece is how you end up with a closet you are afraid to open.
Taming the Paper
Paper is the enemy, and it multiplies when you are not looking. Our system is brutal and simple: a single inbox tray for finished work, a monthly sort into each child's portfolio binder where we keep two or three strong samples per subject, and recycle the rest. If you want a full framework for what to keep and why, our homeschool portfolio and record-keeping guide walks through it. The container for daily collection matters less than the habit of clearing it weekly.
Lighting: The Most Overlooked Element
Nobody plans a homeschool room around lighting, and then everybody wonders why afternoon lessons feel like wading through mud. Light is not decoration; it is fuel for attention and reading stamina.
Put the work zone near a window if you possibly can. Natural daylight improves focus and mood, and a child reading by a sunny window for an hour is calmer than the same child under a buzzing overhead fixture. Position the table so the window light falls across the page rather than directly into anyone's eyes, and you avoid both glare and the harsh shadows that make handwriting practice harder.
For the gray mornings, the early-dark winter afternoons, and the inevitable basement schoolrooms, add a good task light. A full-spectrum LED desk lamp on the work surface makes a real difference for reading and detailed work; look for one with adjustable color temperature so you can run it warmer in the evening. And the single cheapest lighting upgrade available is to swap the cool blue bulbs in your overhead fixture for warmer soft white LED bulbs around 2700 to 3000 Kelvin. It sounds trivial. It changes how the room feels in a way you notice immediately.
The Montessori Approach to the Prepared Environment
If you are drawn to Montessori or simply want maximum independence, the guiding idea is the prepared environment — a space arranged so the child can do almost everything without an adult. Every element serves accessibility: low shelves, child-sized tools that actually work, a small pitcher they can pour from, a low hook for their own apron, a stool at the sink.
The principles translate to any homeschool, Montessori or not:
- Order. Everything has a fixed, obvious home. Order in the environment builds order in the mind.
- Beauty and restraint. Fewer, well-chosen, attractive materials, displayed with space around them, invite engagement. Clutter overwhelms.
- Real tools, child-sized. A real glass, a real broom cut to size, real scissors that cut. Toy versions teach children their work is not taken seriously.
- Independence by design. If the child can reach it, use it, and return it without help, you have succeeded.
A quiet corner with a soft rug, a low basket of books, and one beautiful object is one of the highest-value square feet in any home — set one up with help from our Montessori peace corner setup guide. And if you want the philosophy behind these choices laid out against other approaches, our Montessori, Waldorf, and Charlotte Mason comparison puts it in context.
Small-Space Solutions: Homeschooling Without a Spare Room
Here is the truth we wish someone had told us early: a dedicated room can actually make you less organized, because unlimited space removes the pressure to make decisions. Small-space homeschoolers are frequently the most efficient of all, because constraints force good systems. If you are working from an apartment, a dining nook, or a single shelf, this section is for you.
Go Mobile
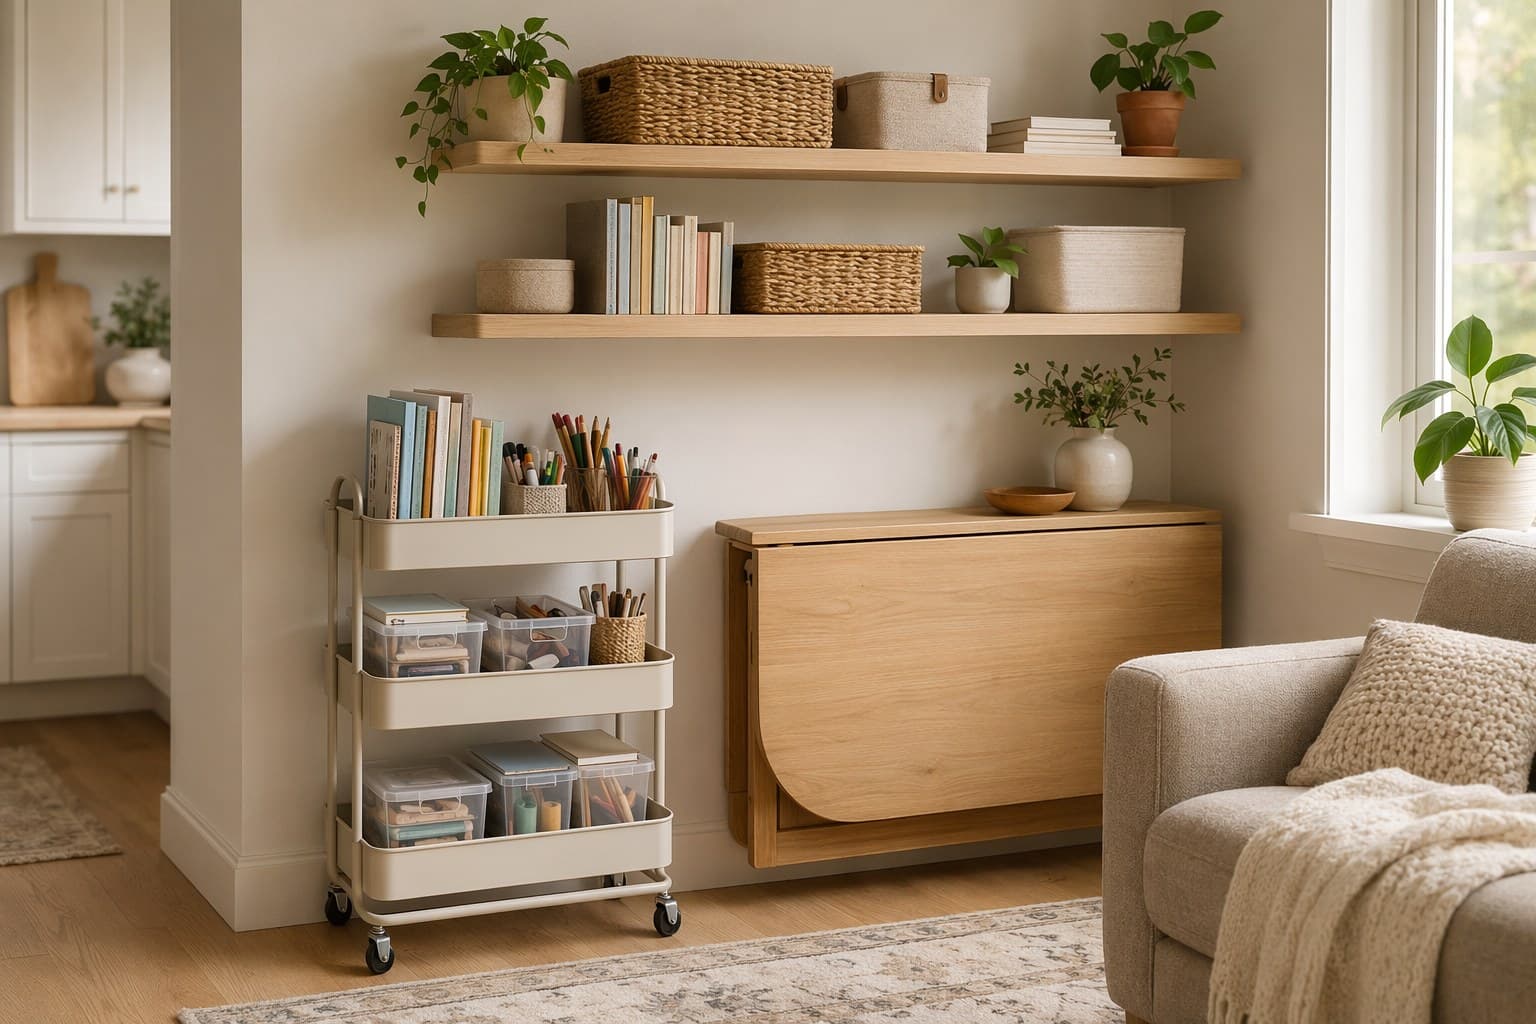
The rolling cart is the patron saint of small-space homeschooling. The IKEA Raskog cart and similar three-tier rolling carts hold a remarkable amount — current books on top, supplies in the middle, manipulatives below — and wheel out for school and into a closet after. Your entire materials zone becomes portable. This single piece of furniture lets a one-bedroom apartment run a full homeschool.
Go Vertical
Floor space is precious; wall space is free. Mount floating wall shelves above the table for books and display, hang an over-the-door organizer for supplies in clear pockets, and use the backs of doors and the sides of cabinets. Everything you store on a wall is floor space you keep for living.
Make Furniture Do Double Duty
In a shared space, every piece should earn its keep twice. A storage ottoman or bench is seating and a toy box. A drop-leaf table is a desk that folds flat against the wall when lessons end. The dining table is the schoolroom from nine to noon and dinner at six, as long as each child's portable bin lets the surface reset completely. The discipline of clearing the table every day is, honestly, a better organizational habit than any dedicated room ever taught us.
For a full budget-first walkthrough including thrifted and free options, see our companion piece on budget homeschool room setup ideas. And if good weather has you wanting to move learning outside, our guide to DIY outdoor learning spaces extends the same principles to the porch and yard.
Putting It All Together: A Sample Setup
To make this concrete, here is how the pieces fit for a typical family with two elementary-age kids in a shared living space:
- Work zone: the existing dining table near the window, with two adjustable chairs and a footrest, and a rotating supply caddy in the center.
- Materials zone: one Kallax shelf along the wall — books and baskets in the lower cubbies at kid height, a personal magazine file for each child, manipulatives in two clear bins on the bottom row.
- Deep storage: a hall closet with labeled bins for next term's curriculum, the science kit, and seasonal materials.
- Lighting: the window for mornings, one full-spectrum desk lamp for afternoons, warm bulbs overhead.
- Display: a wire-and-clip art line on one wall, rotated monthly.
Total dedicated footprint: about six feet of wall. That is a complete, functional homeschool, and it resets to a normal living room in five minutes.
The Space Serves the Learning, Not the Other Way Around
The best homeschool room is the one your family actually uses, kept simple enough that cleanup is fast and materials are easy to reach. Resist the urge to build the Pinterest version before you know how your family works — set up a minimal version, live in it for a month, and add only the pieces a real need reveals. The shelf you bought because a blogger had one will gather dust; the rolling cart you bought because you kept losing the markers will get used every single day.
Start with the three zones. Get the light right. Give every material a home a child can reach. Then close the books, clear the table, and go outside. The space is just the stage. The learning is the play.
Frequently Asked Questions
- Do I need a dedicated room to homeschool?
- No. A dedicated room is a luxury, not a requirement, and plenty of families homeschool beautifully from the kitchen table or a single bookshelf in the living room. What you actually need is three things: a clear surface to work on, a defined place where materials live so they can be put away, and good light. We have seen organized, joyful homeschools run out of a rolling cart in a one-bedroom apartment, and we have seen chaotic ones with an entire finished basement. The system matters far more than the square footage.
- What furniture do I actually need for a homeschool room?
- Start with a work surface and seating sized to your children, a low open shelf for the materials they use independently, and one closed storage spot (a cabinet, closet, or labeled bins) for supplies you do not want out all the time. That is the core. A child-height table with chairs, a sturdy bookcase, and a set of stackable bins will cover the first few years for most families. Add a desk, a reading nook, or a second shelf only when a specific need shows up — not before.
- How do I set up a homeschool space in a small apartment?
- Go vertical and go mobile. Use wall shelves and over-door organizers to store materials off the floor, choose a rolling cart that wheels out for school and tucks into a closet after, and pick furniture that folds or doubles up — a drop-leaf table, a storage bench, an ottoman that opens. Give each child a single portable bin or magazine file for their current work so the dining table can reset to a dining table at the end of the day. Constraints force good systems, and small-space homeschoolers are often the most organized of all.
Enjoying this article?
Get more ideas like this delivered to your inbox every week.